

01 Set up your work:
When texturing in MARI, it is often a great idea to keep the colors and brushes you use most in an easy-to-reach place. You can use the ‘Shelf’ menu to save your most used colors (dragged from the palette) or brushes (with the ‘Plus’ button). If you name them with numbers from 1 to 7, you can also reach them by pressing F9 to open the Pie Menu.
Custom shaders let you view your channels in specific setups. For example, you can set up a shader that shows every channel in context, to get an idea of how the finished asset will look. You can also use shaders that simply display the channel you are working on. Switching back and forth, you can quickly check color and displacement and push them further. Shaders also let you change ambient lighting, ambient occlusion and specular properties.
Patches are the individual textures you paint on your model. A 3D model can have a single patch or multiple patches, depending on how its UVs are laid out. Each patch can be edited individually and can have its own resolution. Even if the model is split into several patches, MARI paints them all the same way, creating multiple textures that combine into the result you want.
MARI has powerful ways to avoid streaks along edges when projecting paint from the buffer. You can turn on edge masking in the ‘Projection’ palette; the fall-off settings control the angle at which the model stops receiving paint. To see the edge mask, tick ‘Mask Preview’ at the top of the Projection palette and choose a color preview. The mask is shown as a glowing edge that updates automatically. Adapting objects:
After you start texturing, the model may need changes, perhaps an extra section. To bring in a new version of the model, right-click the object in the ‘Objects’ palette and choose ‘Add Version’. You can then see all versions of the model, rename them or delete them.
In many cases it is easier to paint on flattened versions of your models. MARI lets you paint in the UV view just as you would in the 3D view. For parts like tentacles, bent limbs or hard-to-reach areas, painting on a flat UV image is the fastest method.
Using photographic elements in your textures quickly gives the model a realistic look. Load all the images you want to use into the Image Manager, then use the ‘Paint Through’ tool to rub parts of an image onto the buffer and combine them with pieces of other images for richer effects. When you are happy with the result, bake it.
MARI offers a strong multi-layer painting experience. To blend a texture of spots with the skin underneath, add a Diffuse Blend shader module. This lets you define exactly which areas of the second channel blend with the channel below and which are ignored, for a flexible, non-destructive workflow.
When painting from an existing photo, the details may not match the geometry. MARI has several tools to warp and touch up the paint in the buffer before baking. The ‘Slerp’ tool lets you push paint around the buffer interactively, the ‘Spline Warper’ uses a grid to deform it, and the ‘Pin’ tool lets you pin areas in place. These features are ideal for creature heads.
There are many ways to mask areas while painting. Besides edge masks (see step 4), there are channel masks. Turning on ‘Channel Mask’ lets you pick one of your texture channels and use it as a mask. By changing the mask settings and/or mask curve, you define how the image masks the model. Even if ‘Mask Preview’ is off, as long as the mask is active you can only paint in unmasked areas. Remember you can use several masks at once.
Once you have finished painting a complex texture, you need a way to adjust it. You may want to change hue, levels, blur or the texture itself. With filters, MARI lets you make all these adjustments much faster. Many filters can be applied to single patches or whole channels, depending on your needs: just pick the filter from the ‘Filters’ menu. Don’t forget to open the preview to see the result before applying it.

When texturing in MARI, it is often a great idea to keep the colors and brushes you use most in an easy-to-reach place. You can use the ‘Shelf’ menu to save your most used colors (dragged from the palette) or brushes (with the ‘Plus’ button). If you name them with numbers from 1 to 7, you can also reach them by pressing F9 to open the Pie Menu.
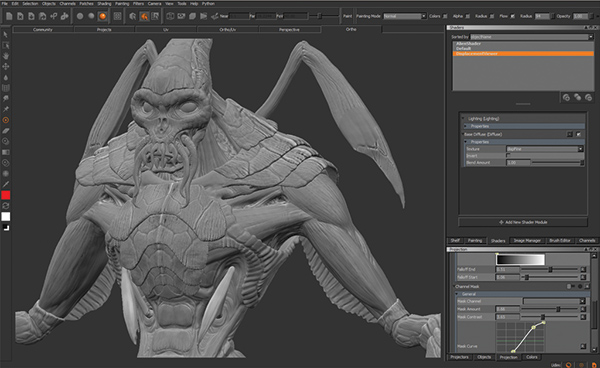
Custom shaders let you view your channels in specific setups. For example, you can set up a shader that shows every channel in context, to get an idea of how the finished asset will look. You can also use shaders that simply display the channel you are working on. Switching back and forth, you can quickly check color and displacement and push them further. Shaders also let you change ambient lighting, ambient occlusion and specular properties.

Patches are the individual textures you paint on your model. A 3D model can have a single patch or multiple patches, depending on how its UVs are laid out. Each patch can be edited individually and can have its own resolution. Even if the model is split into several patches, MARI paints them all the same way, creating multiple textures that combine into the result you want.

MARI has powerful ways to avoid streaks along edges when projecting paint from the buffer. You can turn on edge masking in the ‘Projection’ palette; the fall-off settings control the angle at which the model stops receiving paint. To see the edge mask, tick ‘Mask Preview’ at the top of the Projection palette and choose a color preview. The mask is shown as a glowing edge that updates automatically. Adapting objects:
After you start texturing, the model may need changes, perhaps an extra section. To bring in a new version of the model, right-click the object in the ‘Objects’ palette and choose ‘Add Version’. You can then see all versions of the model, rename them or delete them.

In many cases it is easier to paint on flattened versions of your models. MARI lets you paint in the UV view just as you would in the 3D view. For parts like tentacles, bent limbs or hard-to-reach areas, painting on a flat UV image is the fastest method.

Using photographic elements in your textures quickly gives the model a realistic look. Load all the images you want to use into the Image Manager, then use the ‘Paint Through’ tool to rub parts of an image onto the buffer and combine them with pieces of other images for richer effects. When you are happy with the result, bake it.

MARI offers a strong multi-layer painting experience. To blend a texture of spots with the skin underneath, add a Diffuse Blend shader module. This lets you define exactly which areas of the second channel blend with the channel below and which are ignored, for a flexible, non-destructive workflow.

When painting from an existing photo, the details may not match the geometry. MARI has several tools to warp and touch up the paint in the buffer before baking. The ‘Slerp’ tool lets you push paint around the buffer interactively, the ‘Spline Warper’ uses a grid to deform it, and the ‘Pin’ tool lets you pin areas in place. These features are ideal for creature heads.

There are many ways to mask areas while painting. Besides edge masks (see step 4), there are channel masks. Turning on ‘Channel Mask’ lets you pick one of your texture channels and use it as a mask. By changing the mask settings and/or mask curve, you define how the image masks the model. Even if ‘Mask Preview’ is off, as long as the mask is active you can only paint in unmasked areas. Remember you can use several masks at once.

Once you have finished painting a complex texture, you need a way to adjust it. You may want to change hue, levels, blur or the texture itself. With filters, MARI lets you make all these adjustments much faster. Many filters can be applied to single patches or whole channels, depending on your needs: just pick the filter from the ‘Filters’ menu. Don’t forget to open the preview to see the result before applying it.
Emanuele Serra
London-based Motion Design Director specializing in 3D animation and digital compositing, founder of 3DArt and producer of award-winning films.
Emanuele Serra →


